- Role은 여러개의 연관된 Task를 체계화하기 위해 사용
- 예를 들어, Nginx 를 설치하려면 package repository를 등록해야하고, package를 깔고, 설정 변경이 필요
- Playbook으로 복잡한 작업을 할 수 있지만, 변경해야하는 부분이 복잡하고 어려워 지기 때문에 Role을 사용 → 변수, 파일, 동적 템플릿 등과 같은 추가 데이터 적용
- 프로젝트를 진행한다고 했을 때 마구잡이로 프로그래밍을 하게되면 유지보수하기도, 미래에 재사용하기도 어려움 → 해당 문제를 해결하기 위해 ansible도 코드의 구성을 체계화하고 모듈화를 시키는 Role을 활용
- Role은 여러 연관된 Task들을 체계화시키고 여러 playbook에 추가시켜 사용 가능
- Role을 구성할 때 ansible이 참조할 수 있도록 하나의 디렉토리에 위치해야함
ansible Role(롤)의 구조
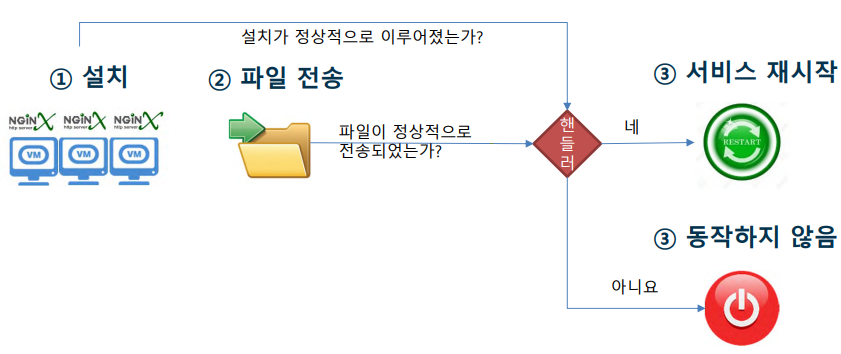
1. handlers
- handlers가 담겨있는 디렉토리
- tasks에 사용할 handler들이 보관되어서 사용
2. defaults
- defaults 인자가 담겨있는 디렉토리
- 각 task에서 사용할 기본값으로, Roles 상에서 기본으로 사용하는 변수
- role defaults는 우선순위가 가장 낮음
- 사용자의 목적 또는 시스템의 환경에 따라 변경이 필요하면 defaults 변수보다 우선순위가 높은 변수에 값을 등록
3. vars
- Role에서 사용할 변수들이 담겨있는 디렉토리
- 적용 우선순위가 높기에 Role default에서 변경될 필요가 있는경우 해당 디렉토리에 변수 지정
4. files
- 배포될 정적 파일들이 위치하는 디렉토리
- tasks에서는 files 디렉토리에서 필요한 파일들을 끌어다가 사용
5. templates
- 배포에 사용될 템플릿들이 들어가는 디렉토리
- python의 jinja2 템플릿 엔진에 기반한 템플릿 변수들이 디렉토리에 담겨있음
- .j2 확장자를 가지고 있으며 파일명은 아무거나 지정하여도 상관 없음
- template/default.conf.j2 파일을 생성한 뒤, 원하는 대로 커스텀하여 /etc/nginx/conf.d/default.conf 파일로 배포
- ip나 이름과 같이 가변적인 변수들은 vars 디렉토리에 있는 변수 참조
- task에서 templates 사용 방법
- name: Add Default config
template:
 src: templates/default.conf.j2
 dest: '/etc/nginx/conf.d/default.conf'
6. meta
하나의 Role을 사용하는 경우에는 상관없으나, 여러 Role을 사용하는 경우에 필요
여러 Role이 의존성(dependency)을 가질 때, 미리 수행되어야하는 Role을 지정하는 경우 사용
meta 디렉토리의 main.yaml은 Role의 메타정보를 담고 있음
자동으로 생성된 main.yml 파일은 아래와 같이 생성 가능
제작자, 회사, 라이센스 정보 등 Role에 필요한 dependency 정보들이 기입되어야함
galaxy_info:
  author: your name
  description: your role description
  company: your company (optional)

  license: license (GPL-2.0-or-later, MIT, etc)

  min_ansible_version: 2.1
  galaxy_tags: []

dependencies: []
7. tasks
- 기본 task를 넣는 공간으로 Role의 핵심 디렉토리
- Role이 실제로 동작할 내용이 담겨있음
- 실제적으로 Role의 역할이 구성되는 뼈대
nginx 테스트를 위한 Role 구성 및 사용 방법 (Virtual Box 내부 테스트에서 실행)
- 테스트 환경
- ansible 서버 : 192.168.0.100
- ansible 클라이언트 : 192.168.0.201, 192.168.0.202
1. tasks 디렉토리 구성 (main.yml, centos7.yml, centos6.yml, check_nginx_cfg.yml 파일 구성)
tasks 실행하기 위한 main.yml 파일
$ vi ../tasks/main.yml
---
- name: nginx for Linux
  include_tasks: "{{ linux_version_name }}.yml"
- name: Check nginx config
  include_tasks: check_nginx_cfg.yml

- name: Check nginx service
  debug:
    msg:
      - "{{ lookup('template',' nginx_check.j2').split('\n') }}"
- Centos 7 버전의 OS에서 nginx 설치하는 centos7.yml 파일
$ vi ../tasks/centos7.yml
- name: install epel-release
  action : "{{ ansible_pkg_mgr }} name=epel-release state=latest"
- name: install nginx web server
  action : "{{ ansible_pkg_mgr }} name=nginx state=present"
- name: Upload default index.html for web server
  get_url: url=https://www.nginx.com dest=/usr/share/nginx/html/ mode=0644
  notify:
    - Restart nginx web server
- Centos 6 버전의 OS에서 nginx 설치하는 centos6.yml 파일
$ vi ../tasks/centos6.yml
- name: install epel-release
  action : "{{ ansible_pkg_mgr }} name=epel-release state=latest"
- name: install nginx web server
  action : "{{ ansible_pkg_mgr }} name=nginx state=present"
- name: Upload default index.html for web server
  get_url: url=https://www.nginx.com dest=/usr/share/nginx/html/ mode=0644
  notify:
    - Restart nginx web server
- 설정 파일 check하는 check_nginx_cfg.yml 파일 → nginx -t를 통해 nginx 설정 파일 체크
$ vi ../tasks/check_nginx_cfg.yml
- command: "nginx -t"
  register: nginx
- debug: msg="{{ nginx.stderr_lines }}"
2. handlers 구성(main 파일 구성)
$ vi ../handlers/main.yml
---
- name: Restart nginx web server
  service: name=nginx state=restarted enabled=yes
3. templates(nginx_check.j2 파일 구성)
$ vi ../template/nginx_check.j2
{% if ansible_facts.distribution_major_version == '7' %}
   [ OS : CentOS ver7 ]
    >> yum list installed | grep nginx
    OR
    >> systemctl status nginx
{% elif ansible_facts.distribution_major_version == '6' %}
   [ OS : CentOS ver6 ]
    >> yum list installed | grep nginx
    OR
    >> service nginx status
{% else %}
    >> service nginx status (* Gernally)
{% endif %}
4. vars (main.yml 파일 구성 → role_groups 변수 지정)
$ vi ../vars/main.yml
---
linux_version_name: "{{ 'centos7' if ansible_facts.distribution_major_version == '7'
          else 'centos6' if ansible_facts.distribution_major_version == '6'
          else 'No working Linux version' }}"
5. nginx 테스트를 위해 작성한 Role 디렉토리 하위 tree 구조 확인
$ tree roles/
roles/
└── nginx
    ├── handlers
    │   └── main.yml
    ├── tasks
    │   ├── centos6.yml
    │   ├── centos7.yml
    │   ├── check_nginx_cfg.yml
    │   └── main.yml
    ├── templates
    │   └── nginx_check.j2
    └── vars
        └── main.yml

5 directories, 7 files
6. nginx를 설치하기 위한 Role 파일 구성
위에 작성된 Role 구성을 실행하기 위해서 Playbooks를 작성해야함
roles 디렉토리를 실행하기 위해 roles 디렉토리가 위치한 공간에 해당 yaml 파일 생성
./roles/nginx 디렉토리 아래에 있는 구성들을 실행
$ vi nginx_instal_role.yml
---
- name: Install nginx
  hosts: test
  become: no

  roles:
    - { role: ./roles/nginx }
7. ansible Role을 활용하여 nginx 설치
# ansible role 구성 내용이 담긴 roles 디렉토리와 ansible Role을 실행할 nginx_install_role.yml 파일 확인
$ ls
nginx_instal_role.yml  roles

# 실행 명령어
$ ansible-playbook nginx_instal_role.yml -k
SSH password:

PLAY [Install nginx] ************************************************************************

TASK [Gathering Facts] **********************************************************************
ok: [192.168.0.202]
ok: [192.168.0.201]

TASK [./roles/nginx : nginx for Linux] ******************************************************
included: /root/ansible_test/roles/nginx/tasks/centos7.yml for 192.168.0.201, 192.168.0.202

TASK [./roles/nginx : install epel-release] *************************************************
changed: [192.168.0.201]
changed: [192.168.0.202]

TASK [./roles/nginx : install nginx web server] *********************************************
changed: [192.168.0.202]
changed: [192.168.0.201]

TASK [./roles/nginx : Upload default index.html for web server] *****************************
changed: [192.168.0.202]
changed: [192.168.0.201]

TASK [./roles/nginx : Check nginx config] ***************************************************
included: /root/ansible_test/roles/nginx/tasks/check_nginx_cfg.yml for 192.168.0.201, 192.168.0.202

TASK [./roles/nginx : command] **************************************************************
changed: [192.168.0.202]
changed: [192.168.0.201]

TASK [./roles/nginx : debug] ****************************************************************
ok: [192.168.0.201] => {
    "msg": [
        "nginx: the configuration file /etc/nginx/nginx.conf syntax is ok",
        "nginx: configuration file /etc/nginx/nginx.conf test is successful"
    ]
}
ok: [192.168.0.202] => {
    "msg": [
        "nginx: the configuration file /etc/nginx/nginx.conf syntax is ok",
        "nginx: configuration file /etc/nginx/nginx.conf test is successful"
    ]
}

TASK [./roles/nginx : Check nginx service] **************************************************
ok: [192.168.0.201] => {
    "msg": [
        [
            "   [ OS : CentOS ver7 ]",
            "    >> yum list installed | grep nginx",
            "    OR",
            "    >> systemctl status nginx",
            ""
        ]
    ]
}
ok: [192.168.0.202] => {
    "msg": [
        [
            "   [ OS : CentOS ver7 ]",
            "    >> yum list installed | grep nginx",
            "    OR",
            "    >> systemctl status nginx",
            ""
        ]
    ]
}

RUNNING HANDLER [./roles/nginx : Restart nginx web server] **********************************
changed: [192.168.0.202]
changed: [192.168.0.201]

PLAY RECAP **********************************************************************************
192.168.0.201              : ok=10   changed=5    unreachable=0    failed=0    skipped=0    rescued=0    ignored=0
192.168.0.202              : ok=10   changed=5    unreachable=0    failed=0    skipped=0    rescued=0    ignored=0

Playbook run took 0 days, 0 hours, 0 minutes, 46 seconds
8. nginx 설치 확인
- 192.168.0.201 서버에 nginx가 설치되고, https://www.nginx.com 웹 페이지가 보일 수 있도록 설정되어있는지 확인
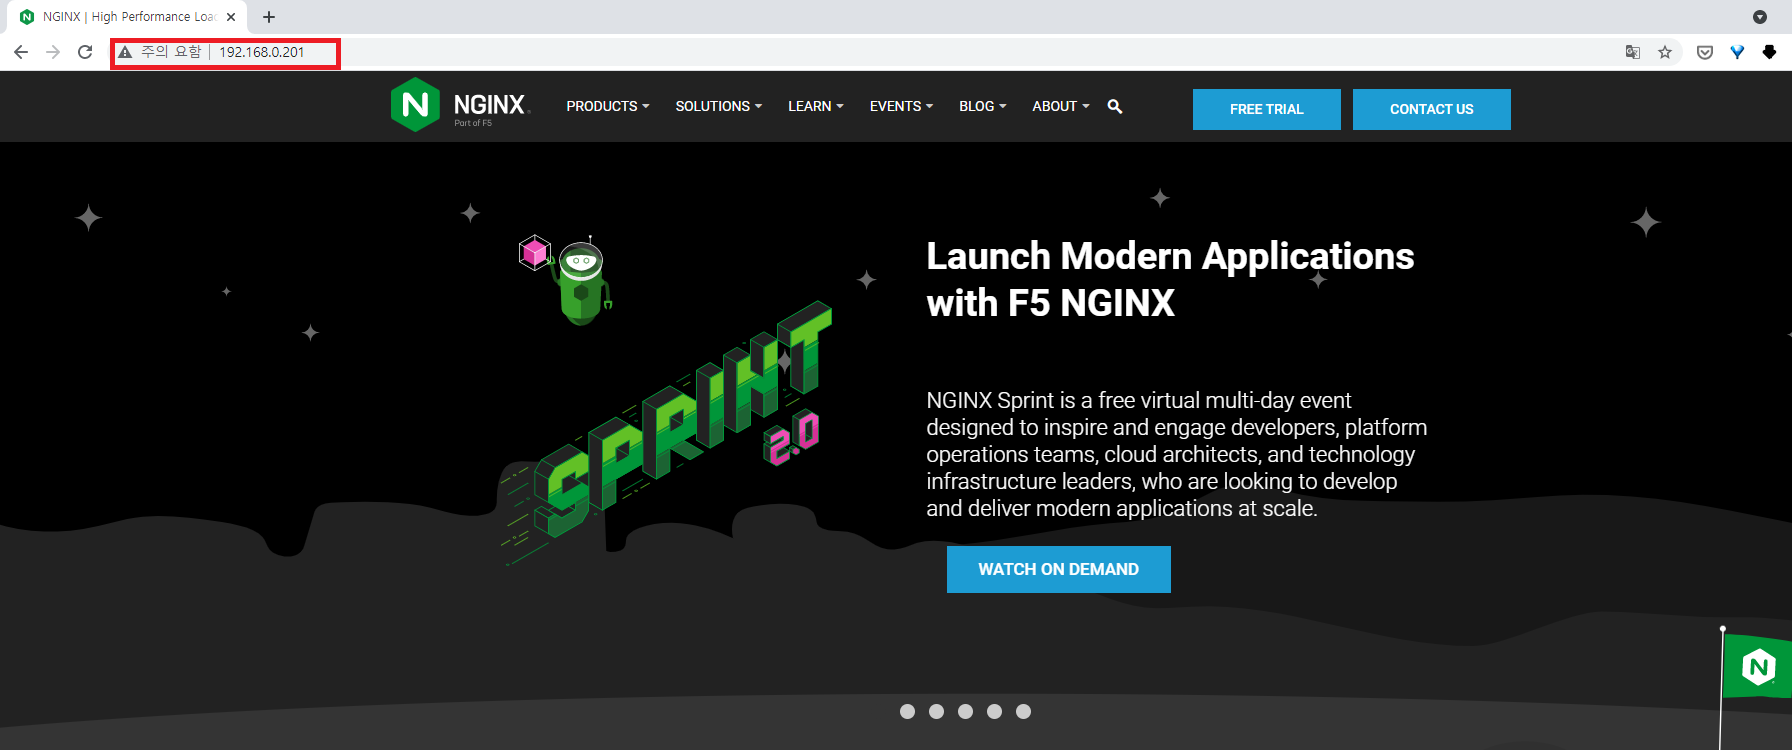
- 192.168.0.202 서버에 nginx가 설치되고, https://www.nginx.com 웹 페이지가 보일 수 있도록 설정되어있는지 확인

'Ansible(앤서블)' 카테고리의 다른 글
| ansible 변수(vars) (0) | 2022.07.24 |
|---|---|
| ansible의 handler → Running Operations On Change (0) | 2022.07.24 |
| ansible get_url모듈을 사용할 때 "libselinux-python aren't installed" 문구 발생하는 경우 (0) | 2022.07.24 |
| ansible의 Include_tasks → ansible의 외부 yaml 파일 사용 (0) | 2022.07.24 |
| ansible의 if → ansible 조건문 (0) | 2022.07.24 |